For many of us, it’s time to start thinking about getting back to the rink and resuming recreational and youth hockey. Getting your gear back into game shape isn’t as important as a good stretching session, perhaps followed by a few crunches and pushups, but it’s a good idea to check your equipment and do any necessary maintenance now rather than getting a nasty surprise when you arrive at the rink for your first game.

If your equipment has spent the offseason sealed up in your bag down in the basement, out in the garage, or maybe even still in the back of your truck, the first thing to consider is a simple safety precaution. Drag the bag out to the driveway, open it up, and dump it. There’s a chance that some creepy-crawling thing has made a home in there – spiders and such love dark, enclosed, stinky places. Don’t forget about the side and end pockets. You might want to wear gloves for this.
If you decide to “donate” your old gear and start fresh, check this series of articles from NewToHockey.com about getting a proper fit.
Cleaning Equipment
With the exception of your helmet, skates and some goalie gear, you can use the washing machine to clean your equipment. (Check the labels for specific cleaning advice – if you can still read the labels, that is.) Ron Grove, Jr., the head equipment manager for the University of Notre Dame’s ice hockey team, advises that you avoid using a top-loading machine with an agitator. “They can cause damage to the foam and straps on some pieces of gear.”
If the liners of your shin guards are detachable, take them out for washing and wipe down the shells separately with a disinfecting wipe. Use a wipe followed by a damp paper towel inside your helmet. You can then re-use that wipe to do the outer shell and cage. If you use a visor, clean it according to the manufacturer’s instructions. Here’s a video about cleaning gear.
Related: Hockey 101: Ice Hockey Equipment
Fasten all of the Velcro straps on your shoulder pads, elbow pads, and pants before washing. If the insoles of your skates are washable, take them out and toss them in too. Use a mild detergent and warm or cold water (not hot). Don’t overload the machine – pants, shoulder pads, shin guard liners, elbow pads, gloves, and insoles are a full load for a large machine, and two loads for a smaller washer.
While the gear is in the wash, take a look at your skate boots and blades. Wipe down the boots, inside first, with a disinfecting wipe. Check the laces for frayed spots and replace them if necessary. Take a look at the blades. If you see some minor surface rust, you can probably remove it with a household cleaner, such as CLR or Lime-A-Way and a rough cloth. Try to avoid the temptation to grab the steel wool – the tiny scratches you may create could lead to more rust down the road.

Any rust in the groove of the blade probably means you’ll want to re-sharpen. You may want to get the blades sharpened anyway, and you might want to have that done at a reliable sporting goods store rather than hoping that the shop at the rink is open and doesn’t have a huge line before your first game.
Related: Return to Hockey: Youth Hockey Gear Swaps
Once the washer beeps, take your gear out promptly. Even if the label says it’s okay to toss something in the drier, air drying is usually better for the gear. Hang it from the fence, spread it out on the picnic bench or patio table, but don’t leave it on the ground. If the sun is shining, you not only dry the gear, you also help disinfect it even more.
Wash Clothing Separately
Wash your jersey – inside out – and underthings separately. If you keep a spare jock or socks in your bag, they need to be washed too. If your jersey has ties at the neck, fasten them before washing. Make sure that all Velcro is fastened. Toss in your towel and everything else that was packed and ready to go for the last couple of months. You might want to wash your laundry bag too. Jerseys and anything else with a printed or heat-sealed logo should be air-dried.
If you need a new laundry bag or just want one that’s extremely cool, consider this beauty from TheHockeyWriters.com. While you’re in the neighborhood, take a look at the shirts, mugs, and other great THW gear available. Just so you know, the large coffee mug is also appropriate for another beverage that’s more closely associated with hockey.

Don’t forget about your mouthguard. Warm soapy water and a good rinse should be all it takes, but this is also a good time to check its serviceability. Are you a chewer? Have the sides broken down? Is it time to replace it? If you don’t buy new, this might be a good time for a re-fit, molding it again to your teeth. Check the manufacturer’s instructions – they’re likely online. (For a look at what you should be doing regularly once the season starts, check out this article at PureHockey.com and this article at ProHockeyStuff.com.)
The Fighting Irish’s Grove has some advice on maintaining your gear the way a top-level NCAA team does:
- Be aware of mold. With helmets and facemasks, if you notice any mold in the padding it’s best to just replace it. Mold is indicated by little black, green or sometimes white dots within the foam. This mold can travel through sweat droplets onto your face causing you to become ill or even create potential areas of infection through open cuts/acne.
- Keep your skates “Insoles-Out.” The biggest maintenance item to remember with skates is to remove your insoles after every use. Water and sweat will build up under these and begin to grow mold and bacteria. Ever wonder why your skates may smell awful? Leaving insoles in can also lead to your rivets rusting out faster as well. Checking these regularly can prevent disastrous situations, like your holder detaching from your boot mid-shift.
- Reduce the stink. A great deodorizer can go a long way as well in your bag (and keep your spouse happy . . . er). When traveling, we throw a couple pods in each player’s bag until we are able to unpack it. (Gear Halo – Amazon.com $20 for a 2 pack)

- Don’t err when it comes to air. The number one thing to remember with keeping your gear fresh and in proper working condition is air circulation. Whether it is taking all your gear out at home to hang dry in front of a fan or simply unzipping your bag to promote air flow, anything is better than nothing.
Before Repacking Your Bag
While your gear is drying, take time to do a little maintenance on your hockey bag. If it’s been sitting packed for months on end, you’ll likely want to use disinfecting wipes on the inside. (If there’s a bunch of dust and junk, vacuum first.) Don’t forget to clean the outer and inner pockets. You’ll also want to use a damp rag to wipe the outside of the bag.
Related: Growing Hockey from the Grassroots Up
Does your bag have wheels? If so, give them a look, too. Wheels that are worn down to the hubs typically can be replaced for just a few bucks and in just a few minutes. Many bags use rollerblade wheels, available at most sporting goods stores. Even if the wheels are in good shape, they might need lubrication.

Speaking of lubrication, the leather palms of your hockey gloves may be very dry and stiff, both from hiding in your bag and washing/drying. There are a number of readily available oils and conditioners for baseball gloves that also work great on our gloves. Alternatively, a small amount of petroleum jelly or mink oil can be rubbed into the leather. Let the gloves sit for a few hours (or overnight), then wipe with an absorbent cloth.
This is also a great opportunity to check the bag’s zippers. Rubbing some wax along both sets of teeth will keep the zippers moving smoothly. You can use an old candle stub or whatever wax you use on your stick tape.
Don’t Forget to Check Your Sticks
You’ll probably want to re-tape your sticks to get ready for your return to the ice. Even if the tape isn’t dried out and crumbly, there’s something about the process of taping a stick that’s special for some of us. It’s a way to mentally prepare for actually using the sticks. (For others, it’s just a pain in the you-know-what that only gets done when absolutely necessary.)
Related: Hockey 101: A Beginner’s Guide to Ice Hockey
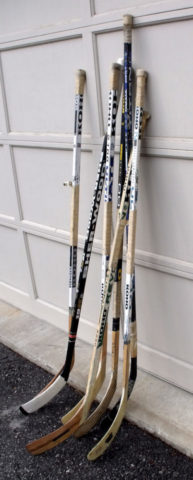
Before you tape your sticks, give them a little checkup first. There’s no sense spending time taping a stick that’s not worth using. Hold the stick as you would on the ice, put the blade on the ground, and put some pressure on the shaft. If it’s too flexy for your taste, consider replacing it.

You’ll also want to check the stick’s blade. Flip it upside down, grab it by the heel and the tip of the blade. Twist the end of the blade, bending the top toward and away from you. If the blade bends, it may be delaminating. When the blade gets soft, your shots and hard passes may “drift” off the end of the curve and send the puck wide of your intended target. Another excuse (um, I meant “reason”) to buy a new stick.
Is it Time for New Gear?
Cleaning and prepping your gear is also a great way to examine it for damage and wear. Are straps tearing off? Is protective padding compressed to the point where it’s no longer “protective”? Have the straps on your elbow pads stretched too much to keep them in place? Are there cracks in your shin guards?
Jump online and visit the major equipment suppliers. Your first click should be “Clearance” or “Sale.” Browsing a few sites, I found incredible deals on last year’s gear. Before you start loading the cart, however, make a plan:
- What’s my budget? How much can you spend? This is often a “couple’s” decision for players in a relationship.
- What equipment do I need? If your helmet is cracked, it won’t provide the most important protection of all. (Yes, the most important – hold the protective cup jokes, please.) Are there frayed or worn straps that you can sew or rivet rather than replacing the gear?
- What equipment do I want? The latest/greatest skates cost hundreds of dollars. Okay, they may weigh a few ounces less than your current pair, but are you at a level where that’s going to make a difference?
- Can I buy the gear locally? If you have a local sporting goods store with a great selection of hockey gear, you might want to start there. This is especially true if you’re buying skates or a helmet, items that you’ll want to try for fit – no, it’s not really “cheating” to try on a pair of skates at a local store and then buy the same model online at a lower price, but if the difference is only a few bucks, I prefer to “shop local.”
Once you start shopping, don’t forget to compare prices between sites. You may find the same item, or something comparable, at a lower price from a different retailer. Don’t overlook shipping charges! If one site offers free shipping on orders over, say, $100, it might make more sense to buy everything you need there rather than spreading your purchases over multiple retailers and paying multiple shipping fees.
A Few More Thoughts
Don’t forget the extras. Do you need tape? Wax? Several years ago I started using Turtle Wax on my stick tape. It gets into all of the little gaps, keeping the tape from getting soggy and, while I can’t prove it scientifically, I think my sticks last longer now – the blades don’t get “flexy” as fast. Wipe it on, wait an hour, wipe off the excess. It’s available at all auto parts stores.

There’s one more purchase I’d like you to consider. I block a lot of shots, sometimes not intentionally, and most of those shots are at foot level. I also like to play near the crease, which results in a lot of “accidental” contact between a defender’s stick and my boot. For several years, I’ve used a product called “Skate Fenders,” available at most retailers and directly from the manufacturer.
Every mark and scratch on my Skate Fenders is an impact that didn’t come into direct contact with my skate. Without the added protection, I’m sure quite a few of those incidents would have had me limping to the bench (if not the x-ray machine). Like a mouthguard and a cage, the more protection I have, the more fearlessly I can play.
Let’s get our gear ready so we can lace ‘em up and hit the ice as soon as it’s safe to do so!